
Table of Contents
- Start With a Master Budget and Guest List
- Wedding Planning Checklist for Busy Couples
- DIY Wedding Timeline Template: Building Your Day-Of Itinerary
- Delegating Tasks to Your Wedding Party and Family
- Best Digital Wedding Planning Tools for DIY Organization
- Protecting Your Mental Health During DIY Wedding Organization
- Post-Wedding Organization: What to Do After the Big Day
- Conclusion
Last Updated: August 7, 2026
Start With a Master Budget and Guest List
DIY wedding organization for busy couples starts with two documents: a budget tracker and a guest list. Get these wrong early, and you'll spend months making decisions without the information you need. Setting these up correctly takes a few focused hours, not weeks.
Build Your Budget Tracker First
Your budget tracker is the single most important planning document you'll create. Every vendor contract, purchase decision, and upgrade question runs through it.
A functional budget tracker needs four columns: category, estimated cost, actual cost, and who's paid. Categories should cover venue, catering, photography, florals, attire, music, invitations, transportation, and contingency. Budget allocation experts consistently recommend reserving a contingency buffer, because something always comes up.
Treat your budget as a living document. Update it every time you sign a contract or make a purchase.
Create a Centralized Guest List Database
Guest list management is where DIY planning most often falls apart. Couples start with a rough count, add names across text messages and emails, and end up with conflicting versions.
A centralized guest list database should capture: full name, mailing address, email, phone, RSVP status, meal preference, dietary restrictions, and table assignment. That last column connects directly to your seating chart, which is why a centralized database matters more than a simple headcount.
Wedding Planning Checklist for Busy Couples
A wedding planning checklist for busy couples works differently than a generic list. It's organized by decision urgency, not just category.

12+ Months Out: Lock In the Big Decisions
The decisions you make at this stage are the hardest to change later.
- Set your total budget and contribution breakdown
- Draft your initial guest list (this determines venue size)
- Research and book your venue (venues in popular markets book 12-18 months out)
- Choose your wedding date
- Start your vendor shortlist for photography and catering
- Create your wedding website with basic details
- Begin building your mood board for overall aesthetic direction
Venue selection drives almost every other decision. Don't finalize a florist or caterer before you know your venue's capacity, layout, and restrictions.
6 Months Out: Vendor Contracts and Communication
This is when vendor management becomes a real job. You're negotiating contracts, confirming details, and tracking deposits across multiple relationships.
- Sign contracts with all primary vendors (photographer, caterer, DJ/band, florist)
- Send save-the-dates and launch your wedding website with RSVP tracking
- Book hair and makeup artists
- Finalize your wedding party coordination
- Order wedding attire with enough lead time for alterations
- Research and book your rehearsal dinner venue
- Create your vendor communication log (name, contact, contract date, next action)
Read every contract before signing. Confirm cancellation policies, payment schedules, and what happens if a vendor goes out of business. According to the Federal Trade Commission's consumer guidance on contracts, written contracts should clearly specify services, payment terms, and cancellation rights before you commit.
Final 30 Days: Ceremony Logistics and Reception Decor
Most planning is done. What remains is execution and confirmation.
- Confirm all vendor arrival times and load-in logistics
- Finalize your wedding day-of timeline and share with all vendors
- Complete seating chart and send final headcount to caterer
- Prepare vendor payment envelopes
- Delegate day-of tasks to wedding party members (written list, not verbal)
- Confirm reception decor setup details with venue coordinator
- Pack your day-of emergency kit
DIY Wedding Timeline Template: Building Your Day-Of Itinerary
Your wedding day-of timeline is the document that holds the entire event together. Every vendor, family member, and wedding party member needs a copy.

A functional day-of binder includes the timeline as its spine, with vendor contacts, ceremony logistics, and reception decor setup details attached. Here's a template structure:
| Time Block | Activity | Who's Responsible |
|---|---|---|
| 8:00 AM | Hair and makeup begins (bride + party) | Bridal party |
| 11:00 AM | Photographer arrives, getting-ready shots | Photographer |
| 12:00 PM | Florist delivers and sets up ceremony florals | Florist + venue contact |
| 1:00 PM | Wedding party photos, first look | Photographer + wedding party |
| 3:00 PM | Guests begin arriving, ushers in position | Ushers |
| 3:30 PM | Ceremony begins | Officiant |
| 4:15 PM | Ceremony ends, cocktail hour begins | Catering staff |
| 5:30 PM | Reception doors open, guests seated | Venue coordinator |
| 6:00 PM | Grand entrance, first dance | DJ/band |
| 9:30 PM | Last dance, send-off preparation | Wedding party |
| 10:00 PM | Venue clear-out begins | Designated family member |
Build your timeline backwards from the ceremony start time. Every activity before the ceremony has a fixed endpoint. Work backwards to confirm you've allocated enough time for each step.
The Ever After Suite Printable Wedding Day-Of Binder ($21.99) includes a pre-built timeline template alongside vendor contact sheets and wedding party duty assignments.
Delegating Tasks to Your Wedding Party and Family
The biggest mistake busy couples make: they try to do everything themselves.
Delegation is not optional for couples with demanding careers. It's a structural requirement. The most effective approach is written task assignments with clear deadlines. Verbal requests get forgotten.
What to delegate:
- Day-of vendor coordination: assign one person as the vendor point of contact on your wedding day
- Guest communication: a family member can manage RSVP follow-ups and address collection
- DIY project assembly: schedule a dedicated assembly session with your wedding party and provide clear instructions
- Venue breakdown: assign a specific person to oversee venue clear-out at the end of the night
According to research on effective delegation from Harvard Business Review, the most common failure in delegation is assigning tasks without context. Tell your wedding party not just what to do, but why it matters and what success looks like.
Best Digital Wedding Planning Tools for DIY Organization
The best digital wedding planning tools for DIY organization share one quality: they reduce the number of places you're storing information.
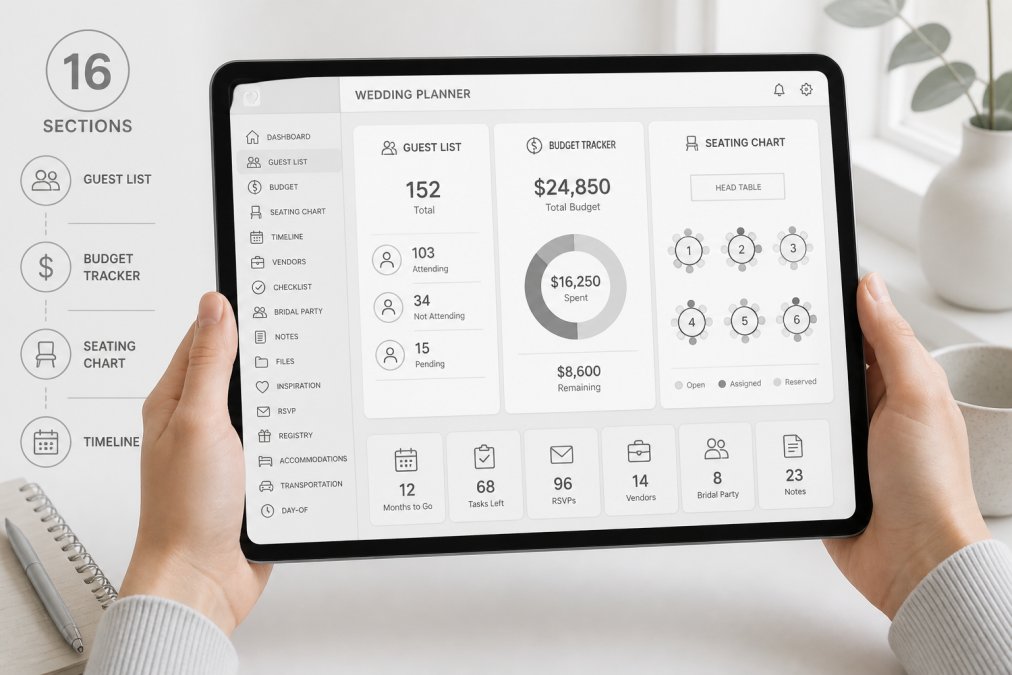
The core problem with most planning setups is fragmentation. Guest list in one app. Budget in a spreadsheet. Vendor contacts in email. Seating chart on paper. Every decision requires pulling from multiple sources.
What to look for in a DIY planning tool:
- Centralized database: guest list, seating, and RSVP tracking in one place
- No subscription required: a one-time purchase avoids losing access if you stop paying
- Offline compatibility: cloud-dependent tools fail at the worst moments
- Shareable with your partner: both of you need access without version conflicts
The Ever After Suite Digital Wedding Planner ($21.99) addresses fragmentation directly. Its 16 interconnected sections connect your guest list to your seating chart, your vendor contacts to your timeline, and your budget tracker to your payment schedule, all in a single instant-download file. For couples who've already started with a spreadsheet, migration typically takes less time than expected.
As productivity research from the American Psychological Association notes, reducing the number of tools you switch between meaningfully decreases cognitive load. For busy couples, that's a significant benefit.
Protecting Your Mental Health During DIY Wedding Organization
DIY wedding organization is genuinely stressful. Burnout prevention requires defined working hours, clear stopping points, and explicit permission to not think about the wedding outside those hours.
Practical strategies that work:
- Set a weekly planning window. Two focused hours on a weekend beats anxious scrolling every evening.
- Separate "decision" tasks from "execution" tasks. Decisions are cognitively expensive. Schedule decisions when your energy is high.
- Name a decision-making process. For aesthetic decisions, one partner leads. For budget decisions, both must agree. This prevents low-stakes disagreements from consuming disproportionate time.
- Build in a planning-free week. Take a full week off from wedding planning between the 6-month and 30-day marks. You'll return with more clarity and less resentment.
The couples who enjoy their engagement period are not the ones who planned less. They're the ones who planned in a structured way and then closed the laptop.
Post-Wedding Organization: What to Do After the Big Day
Post-wedding organization is the part most guides skip. It's also the part that can cost you money if you ignore it.
The first 30 days after your wedding have real administrative tasks attached.
Post-wedding checklist:
- Confirm all vendor final payments are settled
- Send thank-you notes within three weeks
- Return any rented items by their deadlines
- File vendor contracts and receipts in a single folder
- Submit gift registry thank-you notes with specific references to each gift
- Preserve your wedding dress if you plan to keep it
- Update your name legally if applicable
Name change logistics require a specific sequence: Social Security Administration first, then driver's license, then passport. The Social Security Administration's name change process details the correct order.
Keep your planning documents archived for at least a year after the wedding. Vendor disputes, insurance claims, and gift accounting questions can surface months later.
Planning a wedding while managing a demanding career is a project management challenge as much as a celebration. The couples who get through it without burnout centralize their information, delegate deliberately, and treat their planning time as a protected resource. Ever After Suite's Digital Wedding Planner brings all 16 planning sections into a single instant-download file, so your guest list, budget, seating chart, and vendor contacts are always in one place. Get started with Ever After Suite and spend less time managing your planning system and more time enjoying the process.
Frequently Asked Questions
How do you stay organized while planning a DIY wedding?
The most reliable approach is to centralize everything in one place rather than spreading details across texts, emails, and separate spreadsheets. Build a master checklist sorted by deadline, assign every task an owner, and track your budget and guest list in the same system. A structured digital planner like Ever After Suite keeps guest list management, RSVP tracking, seating, and vendor contacts in one interconnected tool so nothing slips through the gaps.
What is the most efficient wedding planning timeline for DIY couples?
Work backward from your wedding date. Book the venue and set the budget 12 or more months out, finalize vendor contracts at the 6-month mark, and complete all ceremony logistics and the day-of timeline in the final 30 days. Busy couples benefit most from a pre-built DIY wedding timeline template that already includes every milestone, so you are filling in details rather than building the structure from scratch.
How can busy couples divide wedding planning tasks fairly?
Divide tasks by interest and availability, not just alphabetically. One partner might own vendor communication and contract negotiation while the other manages the guest list, RSVP tracking, and seating chart. Assign tasks to your wedding party and family for day-of coordination, DIY decor setup, and reception logistics. Document every assignment in a shared wedding binder or digital planner so both partners can see progress without constant check-ins.
What are the best digital tools for DIY wedding planning?
The best tools are the ones your whole planning team will actually use consistently. Subscription apps can become expensive and require everyone to maintain an account. A one-time download like Ever After Suite ($21.99) works directly in a browser with no app or Excel required, covering 16 connected sections including guest lists, seating charts, budget tracking, vendor contacts, and a printable day-of binder. It is a practical option for couples who want everything in one place without ongoing fees.
This article was written using GrandRanker